Monday 27 September 2010

Wordlist Sizes

The post on creating wordlists with crunch v2.4 receives the most hits by far on my blog and from the
queries in the comments section, it would seem that not everyone realises what the potential size can be
when creating wordlists.

EDIT
====
Check out the latest revision of crunch, bofh28 just released v2.6 03-10-2010.
Crunch is now including a size estimate when starting up the wordlist generation, so you can see what size the wordlist you are planning will be.
That along with a few more new nice additions.
Download the latest crunch here;
http://sourceforge.net/projects/crunch-wordlist/
Edit
latest revision of crunch now also included in the backtrack 4 repository.


Lets say you are working on a wordlist for a WPA key (which always have a minimum of 8 characters)
and lets say that you know for a fact that the passkey in question is an eight character combination of the following digits and letters;
0123456789ABCDEF
(like some internet companies have on their broadband modem/routers where I am from).

To create a wordlist with all possible combinations based on the passphrase having 8 characters only,
you could use the following syntax in crunch;

./crunch 8 8 0123456789ABCDEF -o wpa-list.txt

That one line of code seems so simple, yet when you check the estimated size of the wordlist to be created
you would definately think twice about trying to create, save and use it...


The size of the wordlist can be calculated as follows ;

(x^y) * (y+1) = size in bytes
x = The number of characters being used to create the wordlist
y = The number of characters the words/passphrases in the wordlist have.

Based on the above example, we have 10 possible numeric values and 6 possible alpha values,
so 16 characters in total, and we want to calculate based on a wordlist wherein the passphrases have 8 characters.
To calculate what the size would be in konsole we can use "bc" ;

echo "(16^8)*(8+1)" | bc


Or we can even just type it in google; (16^8)*(8+1)
and it will return the same result ;


Next we can check the conversions of the resulting size in KB / MB / GB etc. ;


thats quite a lot...


I put together a (very!) simple script in order to be able to quickly check what kind of size one
is looking at when thinking of creating a wordlist with the same min/max length in crunch;
crunch_size

DOWNLOAD
http://www.mediafire.com/file/dmh989dhmebch43/crunch_size-v0.2

After saving to your /root/ directory for instance, just run by entering ;

./crunch_size-v0.2

You need to enter ;
> the number of characters to be used when creating the wordlist. (using the above example; 16)
> the length of the words/passphrases in the wordlist. (using the above example; 8)


You cant choose to check what the results would be with any fixed patterns, or variables, (have to leave the hard stuff like that to the pro's !) but it is still an eye-opener to see the sizes involved with a 'simple' wordlist.


The result will show you the expected number of words/passphrases in the wordlist along with the estimated
file size in bytes / Kilobytes / Megabytes / Gigabytes / Terabytes / Petabytes


Just a bit of fun and possibly handy to have in your crunch directory for reference ;)

Please comment if I messed up on the calculations anywhere..

Sunday 19 September 2010

Bluetooth mayhem -- part III -- bluejay

UPDATE
=======
Uploaded a revision to bluejay bluetooth scanner;
Download link below


VIDEO of an update again ;

http://blip.tv/file/4240113

File download;
http://www.mediafire.com/file/6eacv5yez0eyv2z/bluejay


 Regrettably, the mayhem I was able to enjoy with bluetooth has basically been limited to scanning..

All in all a rather disappointing outcome after quite a bit of time spent trying to get somewhere.

I have tried to get the famous bluebugger & bluesnarfer to work, however the phones I have to test on do not seem to be vulnerable to the standard attacks and the tools do not seem to be well suited to Backtrack 4 without some serious tweaking.


The bluetooth headsets I got don't seem to show up on any of the scans I do, so I couldn't even test carwhisper either.
Bummer...
Am going to continue to pick up cheapo headsets though as I would love to at least get something working...


There is a serious lack of information on using bluetooth tools with backtrack 4 and I had hoped to be able to contribute to getting some more information out there, however for the time being I have to admit defeat on this one...


The plus side of things is that it motivated me to write my own bluetooth scanner :D

Considering that tools like ghettotooth are still included in backtrack 4, I saw no harm in making something similar, may even propose for it to be included if I am feeling cocky...


So after a lot of trial and error and a hell of a lot of google, my first bash script ;  bluejay

Hopefully someone finds it fun to use, I had a lot of fun (along with frustration...) writing it.
Although I am  sure many looking at the code will probably sh1t themselves laughing, its my first attempt at any bash scripting with a bit of scavenging from teh interwebz... so hey  ;)


bluejay was written with backtrack 4 in mind, and is untested on any other platform.


INSTALLATION & RUNNING
(based on using Backtrack 4)
=========================

1. Download file from below link to a location of your choice (for instance /root/ ).
Download link ;
See download link for bluejay v0.3 at top of page.

2. Make a directory called "bluejay" in /pentest/bluetooth/;
mkdir /pentest/bluetooth/bluejay
Note!
Creating the directory /pentest/bluetooth/bluejay/ is required as bluejay puts temp files in that location.
(Latest version of bluejay will ask if you want to and create directory automatically if you choose to continue)

3. Copy or move the file into the created directory;
mv /root/bluejay /pentest/bluetooth/bluejay/bluejay

4. If you can't run bluejay, you may have to change file permissions ;
chmod 755 /pentest/bluetooth/bluejay/bluejay

5. Then run it ! ;
cd /pentest/bluetooth/bluejay/
./bluejay -h 


HELP INFORMATION
==================

./bluejay -h


LISTING AVAILABLE INTERFACES
============================

 ./bluejay -d
Result of listing devices when only 1 bluetooth interface present ;


Result of listing devices when multiple bluetooth interfaces are installed ;


SINGLE SCANS
=============

With only 1 bluetooth interface installed, bluejay automatically chooses this interface,
usually hci0, and starts the scan ;

./bluejay -s


When starting a single scan with multiple interfaces installed, bluejay will prompt for an interface to
be entered ;

./bluejay -s
 hci2


CONTINUOUS SCANS
==================

With only 1 bluetooth interface installed, bluejay will automatically take the first one it finds,
usually hci0, and start the scan.
When quitting with Ctrl C, bluejay then prompts whether to save the scan results to log or not (y/n)

If choosing not to save, number of found devices is printed to screen and program exits.

./bluetooth -c
(followed by Ctrl C  and "n"  to not save results to log)


If you choose to save the scan results, then bluejay will print the number of devices discovered on screen and
save the results to a logfile in /pentest/bluetooth/bluejay/

Saving the scan results to log ;


When starting continuous scans with multiple bluetooth interfaces installed,
bluejay will prompt you to enter the bluetooth interface you want to scan with.

./bluejay -c
followed by entering interface hci1 in this case
then Quitting with Ctrl C and choosing not to save scan results "n"


I am lazy and got fed up with the typing in of the interface names..
So if you just hit Enter where you are prompted to enter the interface to scan with, bluejay will
automatically choose the first interface it finds (usually hci0) and start scanning with that.

./bluejay -c
Enter
Quit with Ctrl C and "n" to not save the scan results.


Le VoilĂ  !!
The logging side of things is regretfully far from perfect;
If clock offset changes, or if name is cached then the BDADDR will show up more than once in the log.
Am working on a revision v0.3 which will hopefully sort a few things out. It was still a fun project though ;)

I am sure there are loads of ways to make it smoother and quicker, comments with advice and on errors
encountered when using it are appreciated.


Despite the fact that I have more or less given up hope on been able to have the same amount of fun with
bluetooth as can be had with wireless, it is an interesting area to look at and I would appreciate any comments
which may assist with bluetooth hacking.

Wednesday 8 September 2010

Bluetooth mayhem -- part II

In the previous post all kinds of methods have been shown to get hold of the all-important bdaddr or MAC address of the bluetooth devices, so here I am assuming that you have, or know how to obtain, the bdaddr of your test device.

After all the scanning is complete and I have found my test subject... what next ?
Well, as always, get more information !

We can get further information on the device's services and channels by fingerprinting with sdptool;
sdptool -i hci0 browse 6C:9B:02:FF:97:2F
Hectic amount of output there... so what do we actually need ?
From what I have read, we want to get the Service Name, the Service RecHandle and the Channel.

So to simplify the output to get what we want, I will use grep -e (egrep) to make it a little more readable ;
sdptool -i hci0 browse 6C:9B:02:FF:97:2F | egrep 'Service Name|Service RecHandle|Channel'


So at this stage we have the bdaddr of the test device and a list of services and channels which we will use when we prepare for a connection.

Next step is preparing a connection with the device, but first some more preparation;

Editing main.conf
================
nano /etc/bluetooth/main.conf
Edit the line under Default device class to the class you want, in this case I am doing cell phone.
Class = 0x500204
No need to edit anything else.


Editing rfcomm.conf
==================
nano /etc/bluetooth/rfcomm.conf

Edit the rfcomm.conf; enable binding, enter bdaddr of the device you want to connect to, enter channel number of the service you want to access, enter the name of the connection.
Delete the hashes where necessary in the original rfcomm.conf file and finally the file should look something
like the below;


Editing file permissions
====================
Edit the permissions of below files in /etc/bluetooth/;
cd /etc/bluetooth/
chmod 755 {main.conf,networking.conf,rfcomm.conf}

Not sure that editing the main.conf, rfcomm.conf and setting the file permissions is absolutely necessary, as you can set the device class in hciconfig and can enter the rfcomm information directly in the command line... 
But if you can't tell by now... I'm flying as blind as a deaf bat with this ;)

Best to then restart bluetooth service ;
/etc/init.d/bluetooth restart


Configuring your bluetooth interface with hciconfig
===========================================
hciconfig -a hci0 up
Opens and initializes the HCI device
hciconfig -a hci0 class 0x500204
Sets the device's class (0x500204 is for Cell Phone)
hciconfig -a hci0 lm accept, master;
Sets link mode to accept baseband connection and
also to ask to become master when connection request comes in.
hciconfig -a hci0 lp rswitch,hold,sniff,park;
Sets the link policies.
hciconfig -a hci0 name TEST
Sets the name of your bluetooth device

There are various posts on which settings should be enabled, some also mention ;
hciconfig -a hci0 auth enable
hciconfig -a hci0 encrypt enable
This however interfered with sdptool's capability to scan devices for info due to an invalid exchange.
(I assume the due to the device then being set to security mode 3: link level enforced security)
http://www.palowireless.com/bluearticles/cc1_security1.asp


Updating the Service Discovery Protocol Database
==========================================
For instance;
sdptool -i hci0 add --handle=0x10001 --channel=9 OPUSH
sdptool -i hci0 add --handle=0x10002 --channel=10 FTP
sdptool -i hci0 add --handle=0x10003 --channel=1 DUN

The handles and channels for the services may be different for other phones so check all info with sdptool.


OK, so now that's all done, what am I able to do ?
Well, not so much actually.

It turns out that the above configurations haven't helped me in connections, however knowing the processes is always a good thing ;) and might as well document it !


In all connection attempts, I needed to Accept the connection on the cell phone.

Connecting with rfcomm
=======================================
First to try a connection to the OPUSH service which on my cell is on Channel 9.
As all the information has been entered for this in rfcomm.conf I can enter ;
rfcomm bind 0
rfcomm
rfcomm connect 0
If the address already in use error comes up, then release the device or all devices;
rfcomm release hci0 or rfcomm release all and try again.

I have to accept on cell phone to receive data from 'TEST' (name given to bluetooth interface) and then connection is made.


Its probably better practice though to enter the full code in the command line;
rfcomm bind 0 6C:9B:02:FF:97:2F 9
rfcomm
rfcomm connect 0 6C:9B:02:FF:97:2F 9
(I am still obliged to accept data on the cell phone)


The rfcomm connection attempt fails for most services as there are no means I can find included in BackTrack4, to reply to the PIN request from the phone.

To check & verify on the PIN request response issue;
http://www.linuxquestions.org/questions/slackware-14/slackware-13-bluetooth-pan-759274/

After much googling and reading I found a reference to using simple-agent which is included in Bluez-4.32 package.
I just extracted that file (from the 'test' subfolder) and copying the file simple-agent to for instance /etc/bluetooth/ and running it, it returns Agent registered.

When trying to connect with rfcomm to a service prompts a PIN request from the device, such as the below example for OBEX File Transfer, simple-agent returns with RequestPinCode along with the bdaddr where the request came from and prompts for a PIN.

Enter the PIN that was entered in the device (in this case 0000) and pairing is succesful.


Yay ! Connected !


So what have I actually accomplished with all the above ?
Well, it feels like not very much at all, but at least I am a step closer to understanding the connection methods involved.

With a lot, probably a helluva lot, more time on google and various fora, I hope to be able to learn a bit more about bluetooth hacking.

This truly is a slow process ;)

As always, any insightful comments which may help enable the various bluetooth tools in BackTrack4 greatly appreciated.

On to part III ? ! 

Monday 6 September 2010

Bluetooth mayhem


So this is going to be a post which will probably be either updated when possible or deleted
depending on the progress I am able to make with bluetooth ;)

After getting interested in bluetooth again, I came to the conclusion that I really can't get much done at all..
Considering the amount of cash I have spent in the past on wireless adapters to test, getting a pre-paid mobile and a couple of bluetooth dongles and headsets to go crazy on didn't really seem like a bad idea.

So this will be a post containing some information on the bluetooth side of things that that I have been able to get through, which as it stands right now is horrifically little :|

The bluetooth tools included on BackTrack4 are all somewhat dated and their functionality with BackTrack4 not well documented, though bluetooth still forms a part of many wireless security courses, so I have a feeling it is simply a lack of documentation.

The phone I am using to test on is a Nokia 2720 with bluetooth visibility set to permanently visible (except with the tests of tbsearch & fang)
I have a couple of usb dongles, 2x Class 2 and 1x Class 1.


SCANNING FOR -AND LOGGING BLUETOOTH DEVICES
=============================================

First to ensure that the bluetooth devices are up and running ;

hciconfig
hciconfig hci0 up  <-- in my case an internal bluetooth device
hciconfig hci1 up  <-- in my case an external USB dongle
etc.


Getting more info on the bluetooth interface ;
hciconfig hci0 -a


There are numerous methods to scan for devices ;

hcitool
---------
hcitool is the most straightforward, comparable with using the iwlist scan option when checking for wireless.
hcitool dev
hcitool -i hci0 scan
hcitool -i hci0 inq


Alternatively you can use one of the many monitoring tools included in BT4 such as ;
BlueScan, Btscanner, ghettotooth, tbear 


BlueScan
------------
BlueScan will show bdaddr of the device found along with name, manufacturer, active services and active channels along with time of discovery.
However have not figured out how to specify which interface to use; BlueScan always seems to want to use bdaddr of hci0.
After stopping the scan with Ctrl +C you are given 3 options;
1. Print to screen
2. Export results to log
3. Quit

cd /pentest/bluetooth/bluescan/
./bluescan


Btscanner
-------------
Btscanner uses all available bluetooth interfaces for scanning.
It opens an GUI and works similar to the oldschool Kismet, listing found bluetooth devices with the possibility to show further information on the devices when selected.
i          <-- starts an inquiry scan
Enter   <-- gives further info on the device selected
a         <-- aborts the scan
Q        <-- Quits the program
Results for the devices found are logged automatically with a directory created per bdaddr found.
For scanning for devices,  I would say that so far as I have seen, this tool is the one to use.
edit
I have come to the conclusion that I am not fond of the way btscanner ; 
> Does not enable the choosing of individual interface adapters. 
> Logs all the information in separate folders, it makes sense in view of the information included, but it makes it harder to quickly view a list of bdaddr's, Names, Class etc.once programme quits.


btscanner


Further info after selecting the found device;
(q to return to main menu)


ghettotooth
---------------
ghettotooth simply lists the bdaddr's and names of the devices found.
A log is made each time ghettotooth is started.

cd /pentest/bluetooth/ghettotooth/
perl ghettotooth.pl -h
perl ghettotooth.pl hci0
ls


T-bear
---------
A straightforward bluetooth device locator with options to log the results.
Whichever interface is entered to use, the screen shows hci0 as being in use after a few seconds
which is a bit confusing.
edit
Well after having played a bit more with them, I have decided that I like tbear the best for quick scans. 
The reason is that you can choose which interface adapter to use (even though it doesnt correctly mention that on screen) and it is easy to view a quick list of what was found from the logs after quitting the programme. Plus it looks pretty ;)

cd /pentest/bluetooth/tbear/
./tbear -h


./tbear -i hci0 -l log


From what I have read, Tbear did originally come with a load of other tools (http://www.secguru.com/link/tbear_bluetooth_environment_auditing), but in BT4 there are just two other tools with tbear;
tanya & tbsearch

tanya is a DoS tool for bluetooth, however haven't yet played enough with it to get it to work.
I would love to think that the author had a wife / GF called Tanya whose constant rattling reminded him of a DoS..

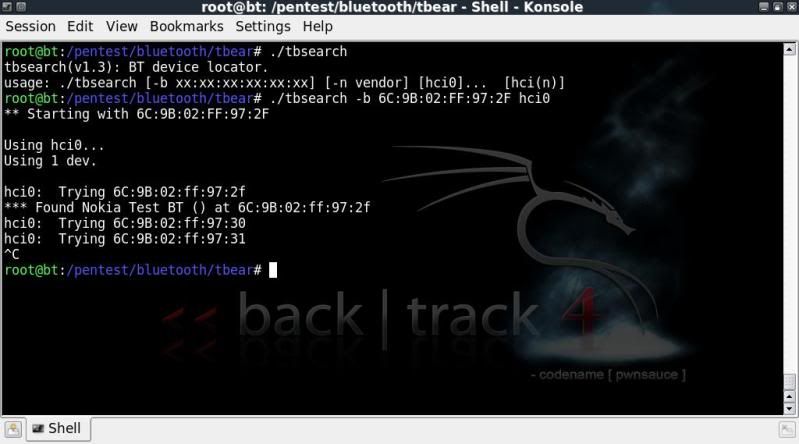
tbsearch is a tool to search for hidden bluetooth devices by checking bluetooth addresses and able to use multiple threads (multiple bluetooth interfaces)
So for instance if you know a device should be in the area and you have the bdaddr or a possible range you can search for it and tbsearch will find it, even if it is in hidden mode, and continue searching for others.
Its not a fast process however..
cd /pentest/bluetooth/tbear/
./tbsearch
./tbsearch -b 6C:9B:02:FF:97:2F hci0
(bluetooth on mobile set to 'hidden')


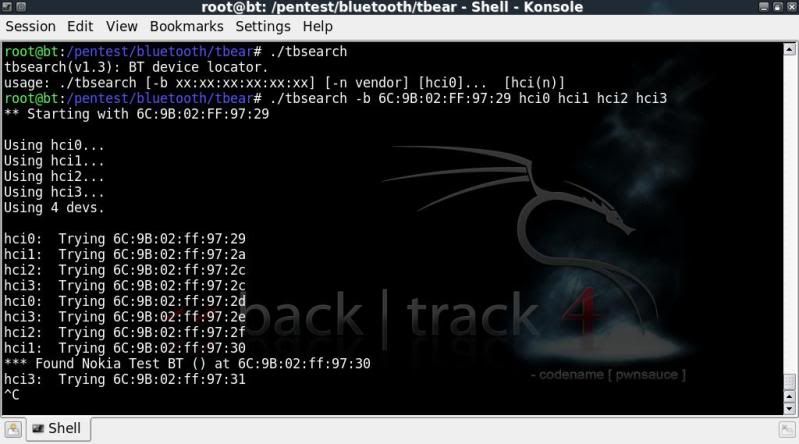
This process can be sped up a bit using multiple dongles, below I have a total of 4 devices checking it all out with a starting point 7 digits before the bdaddr, but as you can see it came back with a false positive..
(30 instead of 2f)
This happened more or less consistently when using multiple interfaces, checking for individual bdaddr's seems to work better when using a single interface with tbsearch.

./tbsearch -b 6C:9B:02:FF:97:29 hci0 hci1 hci2 hci3


redfang
----------
fang checks for 'hidden' bluetooth devices by scanning a range of bluetooth addresses similar to the above tbsearch but somewhat more refined and expanded.
fang appears to work better than tbsearch in detecting hidden devices using multuiple interfaces.

cd /pentest/bluetooth/redfang/
./fang -h


The below example is only testing the last 2 digits of the bdaddr of my test phone (set to hidden) using 4 bluetooth interfaces as above with tbsearch.
./fang -r 6C9B02FF9700-6C9B02FF973F -n 4


 A word of warning, bluetooth and WiFi both use part of the 2.4 GHz band .. carrying out this attack with this many dongles basically caused my wireless network to suffer considerably..


This is the easy stuff, now there is a whole lot more to get my head around, but hopefully the motivation will continue to flow as I have to say, for the moment bluetooth feels a bit like ;


Some reference material ;

http://www.backtrack-linux.org/forums/backtrack-howtos/2583-dr_greens-bluesnarfer-bluebugger-guides-old-fourm.html
http://www.sans.edu/resources/securitylab/bluetooth.php

more to be added..please leave a comment if you have a link to helpful info.
 
Google Analytics Alternative